Introducing Web Developer Sidekick: Your assistant in websites development
Little bit of History
In 2016, I was working at a web agency as Drupal/Symphony developer. I have to work on several projects in parallel. I have to connect to Confluence to get the server access, check a text file for credentials, find out the client contact.... I decided to develop this extension that will allow me to have access all the needed info and details to achieve my daily development tasks.
Keep Your Website Info at Your Fingertips
As a web developer, you have to work on different projects in parallel. You have to record: database credentials, admin dashboard login info and many other important information. You have to keep all this data for each environment. With this extension (let s call it the assistant) you can display all the required data with a simple click. All you have to do is installing the extension then add the appropriate settings for each your website.
How it Works
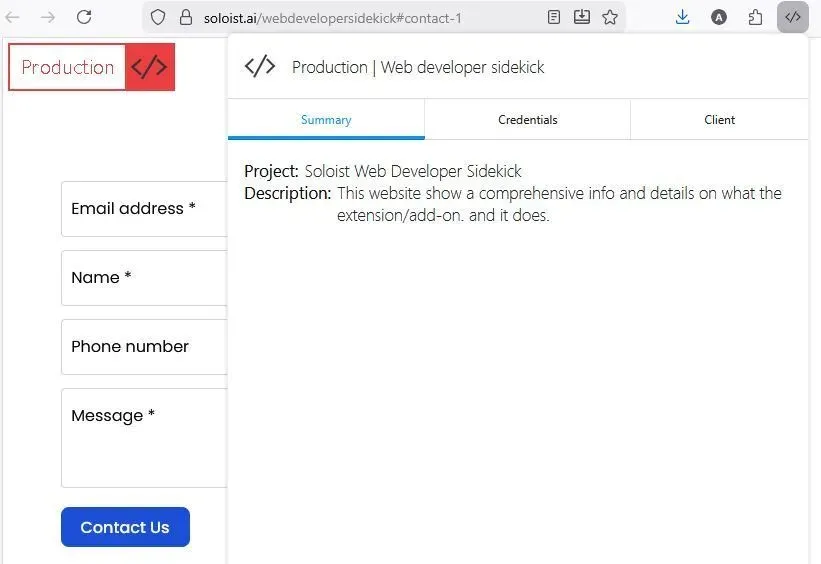
After installing and configuring the assistant, each time you visit a website, it will check if the url of to the website meets any defined rule you have set in the extension options. If it met than you will see a badge announcing which environment you are working. And when you click on the extension icon, the browser will display a popup where you can see the info you entered in the option page.
How to Install the Extension
Where to Get the Extension
You can install the assistant by visiting the following link depeneding on the browser:
Firefox:
https://addons.mozilla.org/en-US/firefox/addon/web-developer-sidekick/
Chrome:
https://chromewebstore.google.com/detail/web-developer-sidekick/fglnkelbadkkikkfabnbioejhdhiahbi
How to Access the Extension Settings
To add your configuration, you have to visit the extension options page.
Firefox:
Visit about:addons
Find the extension Web Developer Sidekick and click on it.
Click on tab Options
Chrome:
Visit
chrome://extensions/?id=fglnkelbadkkikkfabnbioejhdhiahbi
Click on Extension options
The options page has two buttons: Save and Reset. Reset button will retrieve the original settings that come with the extension. Save button will persist your changes in tour browser storage.
Setting Up the Extension
UI and Text Based Configuration
The extension use UI and YAML notation to define the settings and rules.
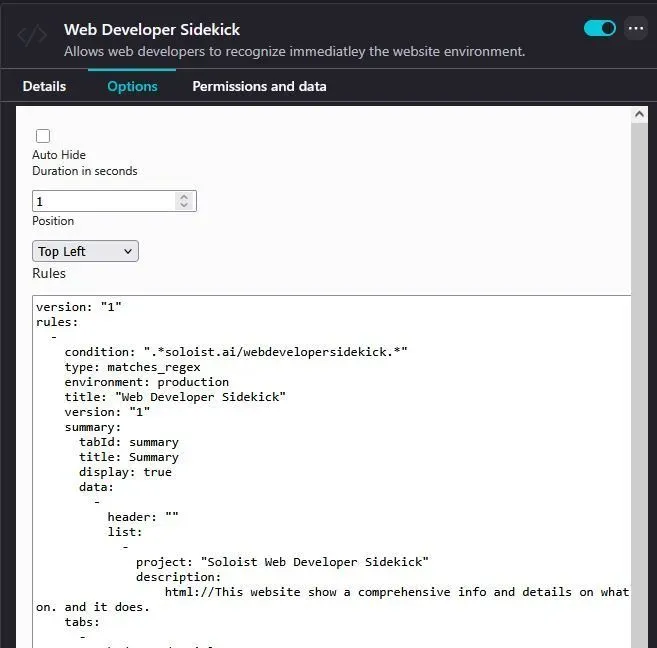
The UI define three options:
Auto Hide:
When checked it will hide automatically the badge (environment "flag"). By default , it's unchecked
Duration in seconds:
When the badge is hovered it will disappear so you can read/see what is in beneath. It will disappear for the defined seconds on this parameter.
Position:
The badge position is defined by this drop down. By default it is set to Top left. This parameter can be override by a rule. We are coming to this in few lines.
Rules this parameter is YAML based setting.
Defining the Rules
The rules consist on a text with predefined structure and keywords.
I recommend to use a YAMLeditor instead of working directly in the extension options. Copy the current YAML text for the options. Edit the content using your favorite text editor that support YAML linting.
Any one who has access to your browser will be able to see the credentials in plain text if you have any.
version:
The version on the engine that will process the text data. The current version is 1
rules:
It s a YAML array that define the rules
Each rule has a mandatory fields:
condition:
Can be a string or a YAML array.
Here an example of an array:
condition:
type
Define the type of the condition. Allowed values are:
in_array: The condition is an array and the url should be in that array.
matches_string: The condition is a string. The url must contains the string.
matches_regex: The condition is a regular expression.
environment:
Accepted values: production, staging, development, integration and local.
title:
The title to display on the popup along with the environment.
summary:
A mandatory tab, that each rule should define. It is displayed when you click on the extension icon. More details on what tab contains are below.
The Tabs
Tabs are a group of details that belong to a specific use. As example database credentials and server domain can be included into Database tab.
Here how to set a tab:
tabs:
The keyword tabs is a YAML array that declares the tabs to display inside the popup. Here what you should include.
tabId:
Used internally. It s a unique id that defines the tab.
title:
The title to display in the tab.
display:
Define whether the extension should display or not the tab.
data:
Is a YAML array that group elements that are related, they will be visually easy to distinguish.
Each element of the array should contains a header and a list.
The header will be highlighted, The list will list the element you defined. It s free-form where you can add any element and value.
Note: Be careful when you add credentials for production environment since any one who has access to your browser can see those credentials.
A full example of rules:
version: "1"
rules:
-
condition:
type: in_array
environment: production
title: "DuckDuckGo Website"
summary:
tabId: summary
title: Summary
display: true
data:
-
header: ""
list:
-
project: "Search Engine Website"
description:
html://This is a demo data to show the addon features<br>
The <b>Summry</b> tab is <b>mondatory</b>.
You can add any useful details over here.<br/>
Thank you for using Web Developer Sidekick!
tabs:
-
tabId: wallet
title: Wallet
display: true
data:
-
header: Paypal
list:
-
username: dev@example.com
password: "123456"
-
header: "Credit Card"
list:
-
MC: "54212121212121"
Expiry: "12/30"
CVV: "1234"