05/05/2026Heldorya Studio
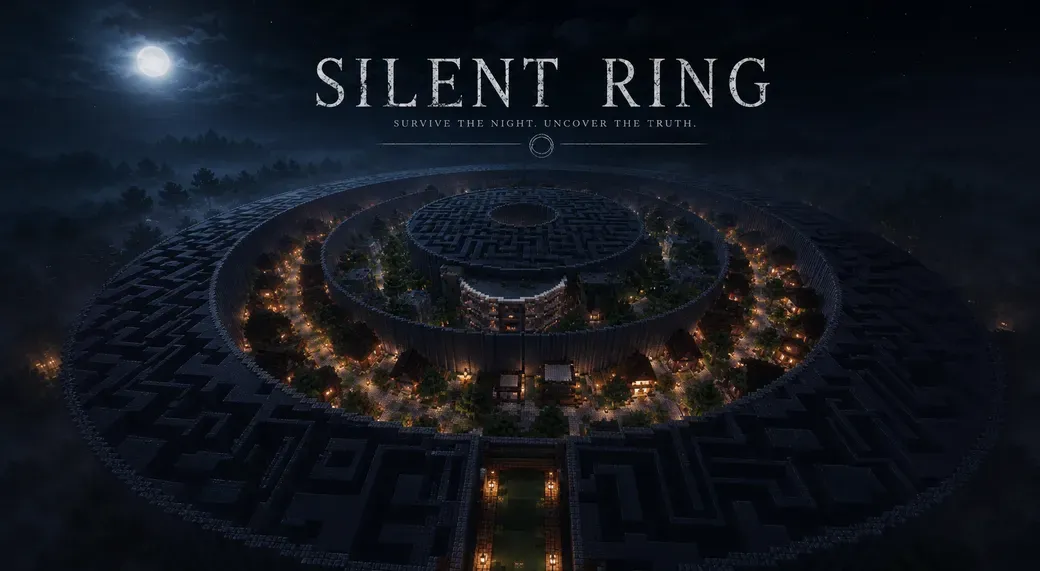
🖤 The Story of Silent Ring Silent Ring tells the story of someone who lost someone important. She never came back. And he stayed, waiting for her. As time passed, the world around him began to change: the maze represents his confusion, the village his happy memories, the ruins the passing of time, and the final labyrinth the exhaustion of someone who can no longer move forward. The pieces scattered across the map are not just items to collect. They are fragments of memory, small traces left behind to avoid being forgotten. Reaching the center means reaching the truth: there is no one left to wait for. The true theme of the map is not just survival. It’s about understanding the pain of someone trapped inside a memory. 🎯 Gameplay & Objective Explore the rings, survive the night, and collect hidden pieces scattered across the map. Each piece you find brings you closer to the center. Each path you choose may lead you forward… or back into the maze. Reach the center with the most pieces to win. But remember: surviving is not the same as understanding. 🌙 Why Play Silent Ring Silent Ring is not just a map you play. It’s a world you explore, a story you uncover, and a feeling you carry with you. Every ring is designed to make you feel something: uncertainty, nostalgia, loss… and finally, silence. Whether you play alone or with friends, the experience will not be the same for everyone. 🌀 The First Ring — The Maze The first ring introduces the player to confusion. The maze is not only a physical obstacle, but also a representation of the protagonist’s mind. Every narrow path, repeated turn, and dead end reflects his inability to move forward. The signs found here are thoughts that keep repeating inside his head. Phrases like: “I waited for you here longer than I should have.” “Sometimes I think I hear footsteps.” show the beginning of his obsession: he is still waiting, still listening, still hoping. 🏘️ The Second Ring — The Village The second ring is the village, a place that once felt alive. Unlike the maze, this area feels more open and familiar. But the silence makes everything feel heavier. The village represents memory and nostalgia. It is where the protagonist remembers the life he had before everything changed. Signs such as: “We used to sit here and talk for hours.” “The lanterns used to stay lit all night.” are not just descriptions of the place. They are emotional memories connected to someone who is no longer there. 🌿 The Third Ring — The Ruins The third ring shows what time has done. Buildings are broken, paths are disappearing, and nature is slowly taking everything back. This part of the map represents decay and acceptance. The protagonist is beginning to understand that the past cannot return. Signs like: “Everything feels older than I remember.” “I walked here today… hoping to see you.” show that hope is still there, but it is becoming weaker. He knows she will not come back, but he still searches. 🧱 The Fourth Ring — The Final Labyrinth The final ring is the most oppressive part of the map. The space becomes tighter again, but this time it is not confusion. It is exhaustion. The protagonist is no longer searching. He is simply staying. Signs such as: “I don’t know why I’m still here.” “Hope is a cruel thing to keep.” “I’m so tired.” show the complete emotional collapse. There is no more denial, no more illusion. Only emptiness remains. 🎯 The Center — The Truth At the center, there is no reward. No answers. No resolution. Only silence. This is where the meaning of everything becomes clear: he was never waiting for her to return. He was waiting because he didn’t know how to leave. 💍 Gameplay Guide 🌙 Overview Silent Ring is a dark multiplayer survival experience for 1–6 players , built around exploration, atmosphere, survival, and optional environmental storytelling. The objective is simple: Explore the rings, survive the dangers, collect as many PIECES as possible, and reach the final center room. At the end of the game, the player with the most PIECES wins. Before starting, players can decide if they want to play in: Cooperative Mode or Free-for-All PvP Mode The entire map takes place under a permanent night . The sun never rises. 🌀 Map Structure The map is divided into: 4 main rings plus a final center room Each ring contains: different gameplay different atmosphere different dangers different progression mechanics The rings must be explored in order. Players are NOT allowed to: break the main walls dig under the rings bypass map areas 🧩 The PIECES System At the beginning of the game, each player chooses one of 6 unique PIECES . The PIECES are: 🎆 Firework Star 🔥 Magma Cream 🐚 Nautilus Shell 👁️ Eye of Ender 🌊 Heart of the Sea ☄️ Fire Charge These PIECES are already scattered across the map from the very beginning inside loot chests. Players may find: their own PIECES neutral loot other players’ PIECES Finding another player’s PIECES can reduce their chances of winning while increasing yours. This makes exploration important immediately. 🌀 First Ring — The Maze The first ring is a massive dangerous maze. Inside, players will find: dangerous mob spawners hidden loot chests food weapons potions PIECES There is only one exit. This ring is designed to create confusion, pressure, and survival tension from the very beginning. ⚠️ Creepers have been completely removed from the map. 🏘️ Second Ring — The Safe Village The second ring is a large abandoned village. This is the only safe area of the map. No hostile mobs spawn here. Players can use this area to: trade with villagers organize their inventory prepare supplies recover before moving forward Two hidden exits lead toward the next ring. This is the main preparation area of the map. ⚠️ Only a small number of villagers are present inside the village. Before starting the gameplay, make sure the villagers have not despawned. It is also recommended to avoid checking the village chests before the official start of the match. 🌿 Third Ring — The Ruins The third ring is a dangerous post-apocalyptic area overtaken by vegetation and decay. Players will encounter: mini dungeons stronger mob encounters guarded loot chests hidden areas rare rewards additional PIECES Enemies in this area can be much more dangerous than normal zombies or skeletons. ⚠️ The ruins also contain two hidden exits leading toward the next ring. Careful exploration is required to progress. 🧱 Fourth Ring — The Final Maze The fourth ring is a second maze. Smaller than the first one, but more oppressive and dangerous. Players can still find: hidden loot additional PIECES secret paths At this point, player tension usually becomes much stronger, especially in PvP mode. 🎯 Final Center Room The game ends when the surviving players reach the final center room. Here, players count their collected PIECES. The player with the most PIECES wins the game. 💀 Permanent Death Death is permanent. When a player dies: they are eliminated from the match they automatically respawn in Spectator Mode they can no longer interact with the game world Every decision matters. ⚔️ Co-op or PvP Before starting, players can choose how they want to play: Cooperative Mode Players work together to survive and reach the center. PvP Mode Players may fight, betray, steal, and compete for the highest number of PIECES. Even in cooperative mode, the final winner is still determined by the amount of collected PIECES. 📖 Optional Storyline Silent Ring also contains an optional hidden story. The story is told through: books signs abandoned places environmental details Players may follow the story while exploring the rings, or simply focus on gameplay and survival. The story revolves around: memory loss silence isolation emotional decay Each ring represents a different emotional state: the maze represents confusion the village represents memory the ruins represent time and decay the final labyrinth represents exhaustion The storyline is optional, but it gives the map a much deeper meaning. 🖤 Small Easter Egg If you actually made it this far into the blog post… thank you. A lot of time, effort, and passion went into creating not only the map itself, but also the atmosphere, story, visuals, and everything surrounding this project. So here’s a small hidden reward for the people truly supporting my work: 🌙 If you leave a like and comment on my patreon: “Silent Ring🖤” I’ll send you one free build of your choice from my shop 🖤 🚫 Important Rules Players are not allowed to: break the main walls dig under the rings bypass map areas skip progression Any player breaking these rules should be considered eliminated. 🏆 How To Win Choose your PIECE Enter the rings Survive the dangers Collect as many PIECES as possible Reach the center Count the PIECES The player with the most PIECES wins
Read More